基于lerna开发脚手架
脚手架开发难点
- 分包:将复杂的系统拆分成若干个模块
- 命令注册(vue create、vue add、vue invoke)
- 参数解析:
- options全称:--version、--help
- options简写:-V、-h
- 带 params 的 options:--path /User/zjw/Desktop/vue-test
示例:
vue command [options] <params>
- 帮助文档:
- global help
- Usage
- Options
- Commands
- global help
示例:vue 的帮助信息:
Usage: vue <command> [options]

Options:
  -V, --version                              output the version number
  -h, --help                                 output usage information

Commands:
  create [options] <app-name>                create a new project powered by vue-cli-service
  add [options] <plugin> [pluginOptions]     install a plugin and invoke its generator in an already created project
  invoke [options] <plugin> [pluginOptions]  invoke the generator of a plugin in an already created project
  inspect [options] [paths...]               inspect the webpack config in a project with vue-cli-service
  serve [options] [entry]                    serve a .js or .vue file in development mode with zero config
  build [options] [entry]                    build a .js or .vue file in production mode with zero config
  ui [options]                               start and open the vue-cli ui
  init [options] <template> <app-name>       generate a project from a remote template (legacy API, requires @vue/cli-init)
  config [options] [value]                   inspect and modify the config
  outdated [options]                         (experimental) check for outdated vue cli service / plugins
  upgrade [options] [plugin-name]            (experimental) upgrade vue cli service / plugins
  migrate [options] [plugin-name]            (experimental) run migrator for an already-installed cli plugin
  info                                       print debugging information about your environment

  Run vue <command> --help for detailed usage of given command.
- command help
- Usage
- Options
vue create 的帮助信息:
Usage: create [options] <app-name>

create a new project powered by vue-cli-service

Options:
  -p, --preset <presetName>       Skip prompts and use saved or remote preset
  -d, --default                   Skip prompts and use default preset
  -i, --inlinePreset <json>       Skip prompts and use inline JSON string as preset
  -m, --packageManager <command>  Use specified npm client when installing dependencies
  -r, --registry <url>            Use specified npm registry when installing dependencies (only for npm)
  -g, --git [message]             Force git initialization with initial commit message
  -n, --no-git                    Skip git initialization
  -f, --force                     Overwrite target directory if it exists
  --merge                         Merge target directory if it exists
  -c, --clone                     Use git clone when fetching remote preset
  -x, --proxy <proxyUrl>          Use specified proxy when creating project
  -b, --bare                      Scaffold project without beginner instructions
  --skipGetStarted                Skip displaying "Get started" instructions
  -h, --help                      output usage information
还有很多,比如:
- 命令行交互
- 日志打印
- 命令行文字变色
- 网络通信:HTTP/WebSocket
- 文件处理
等等......
lerna 介绍
原生脚手架开发痛点分析:
痛点一:重复操作
- 多Package本地link
- 多Package依赖安装
- 多Package单元测试
- 多Package代码提交
- 多Package代码发布
痛点二:版本一致性
- 发布时版本一致性
- 发布后相互依赖版本升级
package越多,管理复杂度越高
lerna 简介:
lerna 是一个优化基于git+npm的多package项目的管理工具。
使用 lerna 开发脚手架优势:
- 大幅减少重复操作
- 提升操作的标准化
lerna 是架构优化的产物,它揭示了一个架构真理:项目复杂度提升后,就需要对项目进行架构优化。架构优化的主要目标往往都是以效能为核心。
lerna 开发脚手架流程(重点)
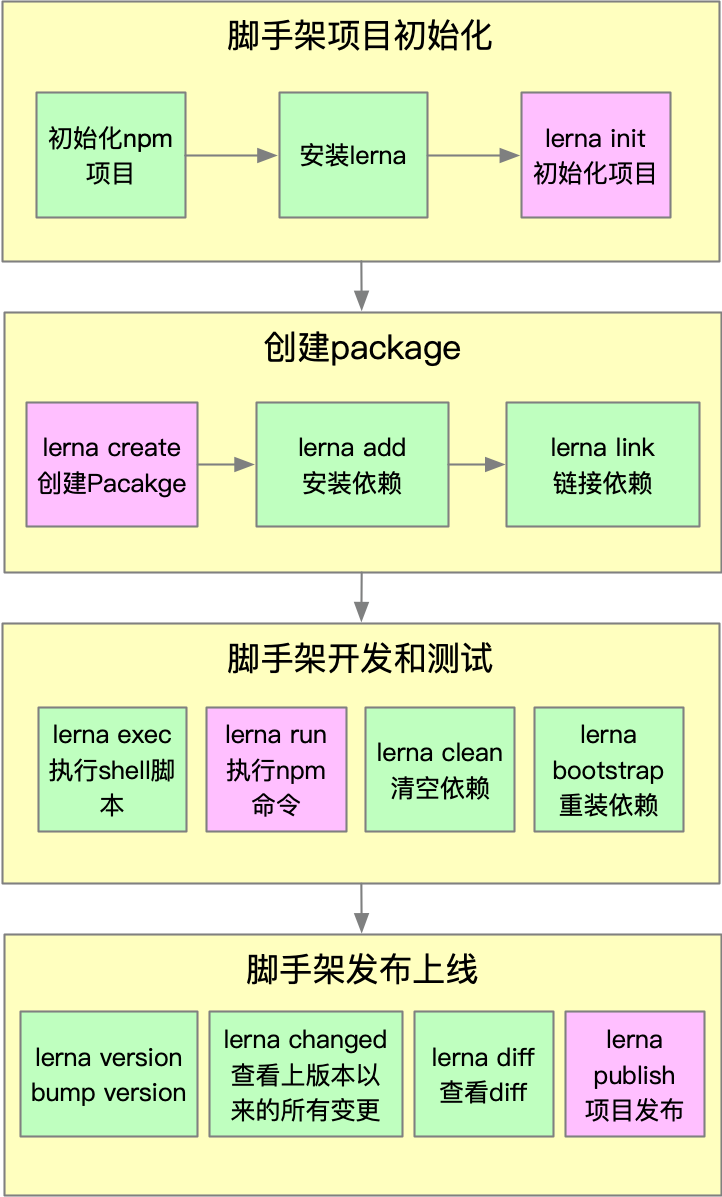
基于 lerna 开发脚手架:
- 安装 lerna
npm install -g lerna
- 创建项目
git init zjw-cli-dev && zjw-cli-dev
- 初始化 Lerna 项目
lerna init
- 创建 Package
lerna create core
- 安装依赖
# 安装到所有 package 的 dependencies
lerna add mocha

# 安装到所有 package 的 devDependencies
lerna add mocha --dev

# 安装到某个 package 的 devDependencies 下,如果之前已经安装过了,请先把 package.json 中的依赖删除
lerna add mocha package/core --dev
- 删除依赖
lerna clean
- 重新安装依赖
lerna bootstrap
- 执行单元测试
# test 命令是在 package.json 配置的 script 命令
lerna run test
- 执行特定包的单元测试
# 安装依赖提供的时文件夹名称,而执行命令使用包名称
lerna run --scope @zjw-cli-dev/core test
- link 项目
lerna link
- 发布项目
lerna publish
使用细节:
lerna init
- 会自动完成 git 初始化,但不会创建 .gitignore,这个必须要手动添加,否则会将 node_modules 目录都上传到 git,如果 node_modules 已经加入 git stage,可使用:
git reset HEAD <file>
执行 unstage 操作,如果文件已经被 git 监听到变更,可使用:
git checkout -- <filename>
将变更作废,记得在执行操作之前将文件加入 .gitignore
# gitignore
.vscode
.idea
.DS_Store

node_modules
packages/**/node_modules
lerna-debug.log
lerna create
- 在创建 package 时,为了防止重名在输入 package name 时一般都是创建在某个组织内,如:@zjw-cli-dev/core。在 @ 和 /之间就是组织名称。
声明在组织内的 package 需要 npm 上创建对应的 组织,否则发布不了。(Add Organization ---> 输入名称,点击 create ---> 点击 skip)
// package.json
{
    ...
    "name": "@zjw-cli-dev/core",
    ...
}
lerna add
- 第一个参数:添加 npm 包名
- 第二个参数:本地 package 的路径
- 选项:--dev:将依赖安装到 devDependencies,不加时安装到 dependencies
lerna add <package> [loc] --dev
lerna link
如果未发布上线,需要手动将依赖添加到 package.json 再执行 lerna link
// 如:在 @zjw-cli-dev/core 的 package.json 中 dependencies 添加 @zjw-cli-dev/utils 依赖
{
    ...
    dependencies: {
        "@zjw-cli-dev/utils": "^1.0.0"
    }
    ...
}
lerna clean
- 只会删除 node_modules,不会删除 package.json 中的依赖
lerna exec 和 lerna run
- --scope 属性后添加的是包名,而不是 package 的路径,这点和 lerna add 用法不同
lerna publish
- 发布时会自动执行:git add package-lock.json,所以 package-lock.json 不要加入 .gitignore
- 先创建远程仓库,并且同步一次 master 分支
- 执行 lerna publish 前先完成 npm login
- 如果发布的 npm 包名为:@xxx/yyy 的格式,需要先在 npm 注册名为:xxx 的 organization,否则可能会提交不成功
发布到 npm organization(group) 时默认为 private,所以我们需要手动在 package.json 中添加如下配置:
"publishConfig": {
    "access": "public"
}
lerna 是如何引用本地 lib 库的?
- package.json 中引用本地依赖
"dependencies": {
    "lerna": "file:core/lerna"
}
- lerna publish 发布时会将
file:进行替换
resolveLocalDependencyLinks() {
    // resolve relative file: links to their actual version range
    const updatesWithLocalLinks = this.updates.filter(node =>
      Array.from(node.localDependencies.values()).some(resolved => resolved.type === "directory")
    );

    return pMap(updatesWithLocalLinks, node => {
      for (const [depName, resolved] of node.localDependencies) {
        // regardless of where the version comes from, we can't publish "file:../sibling-pkg" specs
        const depVersion = this.updatesVersions.get(depName) || this.packageGraph.get(depName).pkg.version;

        // it no longer matters if we mutate the shared Package instance
        node.pkg.updateLocalDependency(resolved, depVersion, this.savePrefix);
      }

      // writing changes to disk handled in serializeChanges()
    });
}